How to Unlock the TataDocomo 3G Modem

0 comments
Recently i have unlocked TATA Docomo 3G USB stick, in this post i will be sharing you the easiest and simplest way to unlock Huawei modem.


Before going further on how to unlock modem, lets see what is this lock and unlock mechanism.

When you buy a phone or modem from telecom service providers, it will be locked to there network. i.e it will be configured to work only for particular frequency of network. If you change SIM card, frequency gets mismatch and this makes your phone not work.

Unlocking is a mechanism wherein you need write a simple unlock code to your cellphone or data card. Once you put the unlock code your mobile or modem it will start catching other networks. Most of the vendors do this once the contract gets completed, but you don't have to wait till that time, here is a simple trick, just follow them and unlock it now.

Note: In internet if you search about unlocking modems, you will get most of the softwares to generate unlock key and you can't unlock your modem with them, You need to look for modem un-locker software. DC unlocker is one among them.

1) First download DC Un-locker software here.
2) Remove SIM card from dongle and plugin to your system.
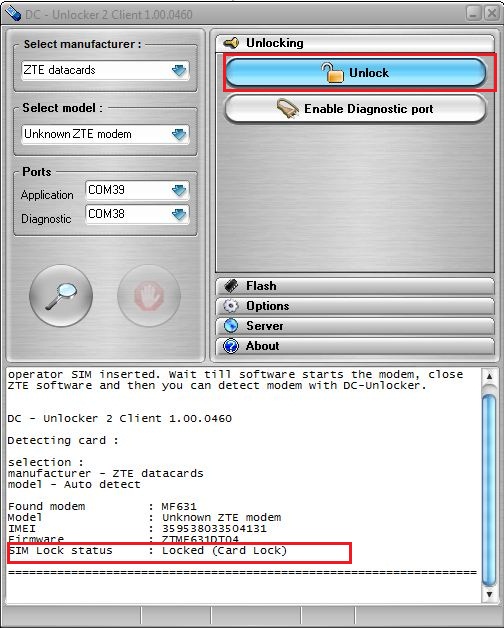
3) Select your modem manufacturer based on your modem type, here i am selecting ZTE huawei modem,
Select appropriate model.

Once you click on search button, DC unlocker scans your device and shows the status as its locked or not.
If its in locked state, right side Unlock button will get enabled.
4)Once you done everything just click on unlock button present at the right side of window, that's all. You are done, you can observe the status in log window. If it says success its unlocked and your dongle will be capable of connecting to any network.

Here how the final log looks.


Now insert different Network SIM cards like Vodafone, Airtel, Idea, Aircel, Uninor etc... it should detect automatically.

Vodafone network in Docomo 3G USB Donlge.


With Vodafone i found some problem in connecting to net, i think we have to modify the settings. But with Airtel it worked fine.


If you face any difficulties please  drop the comments, I will always free to help you.


Read More..

How to delete a Autorun.inf Virus in USB/Flasdrive without using any antivirus 100% working

0 comments
Hey guys I have the best trick to remove/delete autorun.inf virus without a anti-virus.
Many anti-virus are unable to delete it. If deletes it come again. 

WARNING:
DO NOT DOUBLE CLICK ON THE ICON SHOWN BELOW (which will be in your pen drive):

IF YOU CLICK THIS THEN IT WILL INFECT YOUR PC AND WILL MAKE FALSE FOLDERS WHICHEVER PENDRIVE YOU WILL INSERT.

Firstly autorun.inf is not a virus.It does not harm your PC/laptop.Nor it slows down your PC.
It just makes false folders in your Flash drive/Pen drive.
To get rid of this I am showing you a trick which works every time.
Follow the step by step process then only we can understand easily

FOR WINDOWS XP:

1. Firstly open view menu from My Computer.
2. Then enable hidden items and unmark Hide protected operating  files(Recommended) from VIEW menu.
3. Insert your Flash drive/Pen drive.
4. Do not open it by double clicking it in My Computer.
5. In My Computer, Right click on your Flash drive/Pen drive,and then click on search.
6. As it is your Flash drive/Pen drive you that what are its contents. If not type one by one the alphabets ( eg: a,b,c,d,.....z)
7. In the search box write the file or folder name included in your Flash drive/Pen drive.
8. Now simply copy that file in your desired location. e.g. on your harddisk.
9. Remember, do not copy other files which you are unaware of. 
10. By following step 2 you will be able to see hidden files which will include autorun.inf virus. So dont copy that file.
11. After copying all your important files you can format your Flash drive/Pen drive and then BINGO... you are Done ...

FOR WINDOWS 7 AND WINDOWS 8 :

1. Firstly open view menu from My Computer.
2. Then enable hidden items and unmark Hide protected operating  files(Recommended) from VIEW menu.
3. Insert your Flash drive/Pen drive.
4. Do not open it by double clicking it in My Computer.
5. In My Computer, open your flash drive/pen drive by double clicking it and then go to top right corner and then type the file name in search box.
6. As it is your Flash drive/Pen drive you that what are its contents. If not type one by one the alphabets ( eg: a,b,c,d,.....z)
7. In the search box write the file or folder name included in your Flash drive/Pen drive.
8. Now simply copy that file in your desired location. e.g. on your harddisk.
9. Remember, do not copy other files which you are unaware of. 
10. By following step 2 you will be able to see hidden files which will include autorun.inf virus. So dont copy that file.
11. After copying all your important files you can format your Flash drive/Pen drive and then BINGO... you are Done ...


Now you have all your files and your Flash drive/Pen drive is virus free....

I hope you enjoyed this..Please Comment below.
Read More..

Install any OperatingSystem with Pendrive without any software needed

0 comments

HI Folkz...today I come for you a new trick..Instal any os with pendrive i.e, make a pendrive bootable without any softwares needed..

 Just Follow my steps..

Procedure: 
1)Download the ISO file for the version of Windows 7 you own:


The above links point to Digital River, a licensed distributor of Microsoft software. These downloads are each over 3GB, and your product key will work only with your edition of Windows, so make sure to select the right one. or any other operating system

2)After downloading to we need to open that ISO file file with DemonTools..

3)Now In your PC enable the hidden option and see all the files in the ISO image

4)Now place the USB Pendrive and Format it with the certain changes.
  Make sure it was in the NTFS format and Press Restore device defaults and kept Default allocation size....and format it
5)After formating the USB copy the ISo image and paste it into the Pendrive with hidden files...
 That's it NOw you can format your OS asusual...

                                      (or)
Another Method

1)Download the Windows 7 USB/DVD download tool. This utility lets you copy your Windows 7 ISO file to a DVD or USB flash drive. Whether you choose DVD or USB makes no difference; just confirm that your PC can boot to the media type you select.

2) Boot your computer using the Windows 7 DVD or USB flash drive. Follow the prompts to prepare the destination hard drive and install Windows.


I hope you must enjoyed this trick
Read More..

Hack All Passwords Using USB Drive or Pendrive

0 comments


Today I shall tell you how to hack Faceb**k, Gm**l, MSN, Yahoo Messenger, Google Talk, AOL, Digsby, MySpace IM, GAIM etc. password of your friends from their computer using USB flash drive.
This article will teach you that how you can get access to the username and password of your target computer. Here the important thing is that you have access to the target computer.

What is the Logic behind this Hacking Trick?

As we all know that whenever we visits any website then we have to enter username and password. If we have to visit the site daily then  to avoid entering the username and password again and again we just check on remember me on that time.
By checking remember me option we allows windows to save our username and password. And here in this trick we will get the password by a USB Drive i.e. we need not to open any browser.

Which passwords we can hack by using this hacking tool?

All passwords which are saved in any windows browser, can be hacked using this trick.
ex: FB, Gm**l, Outlook Express password, Yahoo Messenger password etc.

What things we will need?

- First download Usb Pass Hack Tool given below:

                                           Download Now

- You can use this pen-drive on any computer to sniff the stored passwords. Just follow the steps given below:

1.  Extract Downloaded File to your Pen drive. 

2.Insert the pendrive to the target PC the autorun window will pop-up. (This is because, we have created an autorun in pendrive).

3. In the pop-up window, user must select the first option (Perform a Virus Scan).

4.  Now all the password hacking tools will silently get executed in the background (This process takes hardly a few seconds). The passwords get stored in the form of .txt files in the pendrive.

5. Now just plug out the pendrive so that your victim will not be able to notice what you have done with his computer.

6. And see the stored passwords in the .txt files

Note: This hacking trick will only reveal the passwords stored in that computer. 

We are not responsible for any  

miss uses of this trick. this trick only for education purpose...
Read More..

Remove Virus from Pen drive without any Softwere

0 comments

Go to ” Folder Option ”
Go to ” View Tab ”
Now unchecked the ” Hide Protected operating system files ”
After it, checked mark ” Show all Files and Folderse ”
Now open USB with Explore button
When USB will be open then you see some system files .exe

But you don’t delete it
You will delete ” autorun.inf ” and ” virusname.exe ”
USB virus has been delete
Read More..

HOW TO STOP VIRUS ENTERY INTO YOUR USB DRIVE ?

0 comments

This trick is very useful if you have virus in your computer and want to copy files from a USB Drive but don’t want to transfer virus to the USB.

STEPS to disable the USB writing option:
To edit the computer registry, first you should log onto
your computer with administrative rights.
First click on Start button and type “Regedit” in Run
option.(win key+R)
Here locate the location to:
HKEY_LOCAL_MACHINESYSTEMCurrentControlSetControl

Here in right side panel, click right to create a key with the name
“StorageDevicePolicies”.
Now in left side panel, select “StorageDevicePolicies” key,
again right click to create new DWORD value then label it
“WriteProtect”. Set its value to “1″.
 But again to enable writing, set its values to “0″.


THATS IT
Now close the registry editor and restart your computer
after any changes to go into effect.
Read More..

Increase the speed of Idea Net Setter

0 comments

2.In Cablenut apply the following settings

Default Receive Window = 17520
Default SendWindow = 8096
Disable Address Sharing = 1
Initial Large Buffer Count = 10
Initial Medium Buffer Count = 24
Initial Small Buffer Count = 32
Large Buffer Size = 4096
Max Fast Transmit = 6400
Medium Buffer Size = 1504
Priority Boost = 0
Small Buffer Size = 128
Transmit Worker = 32
Fast Send Data gram Threshold =1024
Enable Fast Route Lookup = 1
Enable PMTU Discovery = 1
Ignore Push Bit On Receives = 0
Global Max Tcp Window Size =8760
Max Free Tcbs = 2000
Max HashTableSize = 4096
Max Norm Look up Memory =5000000
Sack Opts = 1
Syn Attack Protect = 1
Tcp1323Opts = 0
Tcp LogLevel = 1
Max Dup Acks = 2
Tcp Max Half Open = 100
Tcp MaxHalfOpenRetried = 80
Tcp Recv Segment Size = 1460
Tcp Send Segment Size = 1460
Tcp Timed Wait _Delay = 32
Tcp Useb RFC1122
Urgent_Pointer = 0
Tcp Window _Size = 8760
Maximum ConnectionsPer1_0
Server = 8
Maximum Connections Per Server= 4
Default TTL = 128
DisableUser TOS_ Setting = 0
Tcp Max Data _Retransmissions =6
Default TOSValue = 91


4.Apply the following settings in
Tcp optimizerMax MTU – 1500
MTU Discovery – Yes
Black Hole Detect – No
Selective ACKs – Yes
Max Dup ACKs – 2
Time to Live (TTL) – 128
TCP 1323 Options – uncheck both

5.Apply all and restart your computer

Note: speed up idea net setter settings may change your computer network settings.always perform the operations after creating a restore point.
Read More..

How To Remove Write Protected Error From a USB Pendrive or A Memory Card.

0 comments


.

Sometimes we get an error when we try to copy or write some data on a USB Drive or a memory card. This is because the pen drive may be write protected. Many reasons can cause this problem and hence many solutions. 


1.  First of all try to locate a small switch (if any, that you may have not noticed) at some place on the drive or memory card reader. This is the prime reason for this error. If there is one, switch it to the other side to turn the protection off.

2. The problem can also be caused by some virus activity so just get it scanned by some updated good antivirus which may solve your problem.

3. Download HDD Low Level Format Tool 4.25 and run it to execute a “low-level format”on the drive. This may take few attempts to actually remove the error.


After the low level format, you may need to “Partition the drive“. Dont worry, partitioning a pen drive meansallocating it its File System and Cluster Size that was lost after the Low Level Format. 


For that :

·         Run diskmgmt.msc in Run (win +r).

·         In the disk management window, select the pen drive, right click on it and click on Format.


·         Now choose the File System and Allocation Unit Size and do not check the boxes below.
·         Click OK and the drive will be reusable after this.
4. It may have been deliberately write protected by the earlier post How to write protect your pen drive. So follow the steps to step 5 in this post and change the value to 0 and its done.

[Note : If none of the methods listed above solves your problem then your pen drive might have gone corrupted, so just get it replaced]...


Thanks for reading this and visiting this blog………


Read More..
Icon Icon Icon Follow Me on Google Plus

Copyright 2011 All Rights Reserved / Privacy Policy / Sitemap / Contact Us

Template by / TricksWonder / Powered by / Blogger